
Best Boat Insurance for Florida Boat Owners
A good day on the water can turn expensive fast when a lower unit meets an unmarked obstruction, a storm
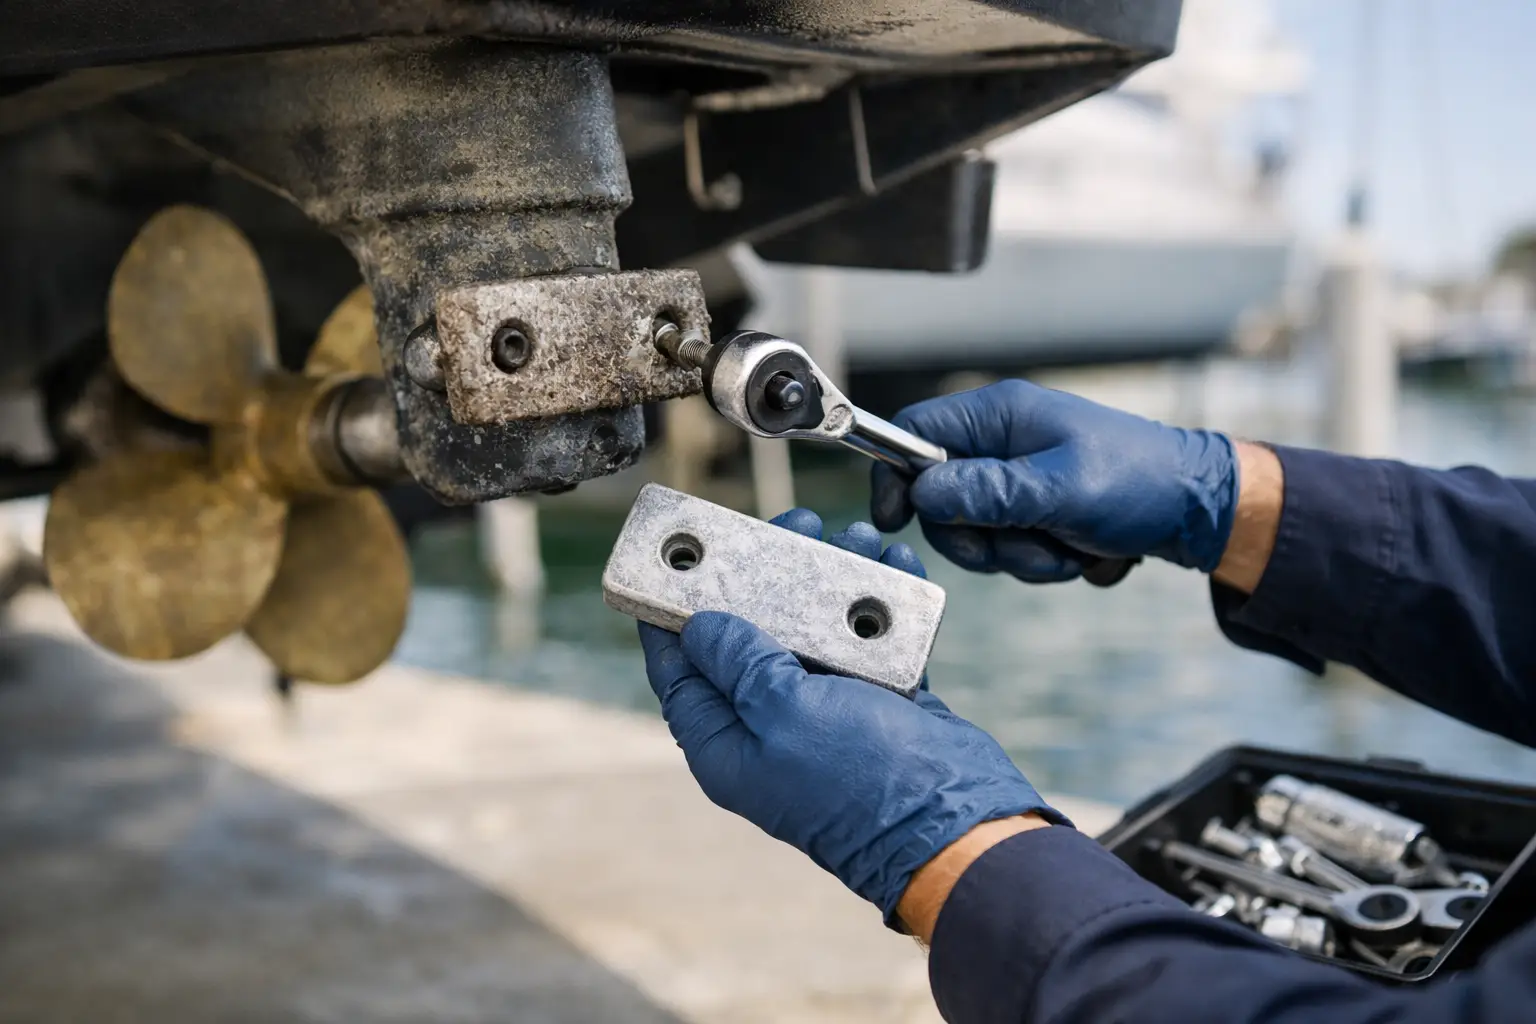
Zinc Anodes. The sacrificial lambs of boat corrosion. As sad a picture as that may paint, their sacrifice actually could save your boat. A pencil zinc that has worn down to a thin, chalky stub is not a small maintenance item to put off until next month. It is the sacrificial part standing between stray electrical current, galvanic corrosion, and expensive metal on your boat. Knowing how to replace boat anodes gives you a practical way to protect your engine, propeller, trim tabs, outdrive, and underwater hardware before corrosion gets a foothold.
For Florida boaters, this job matters even more. Warm saltwater, long dock stays, mixed-metal marina environments, and shore power can all speed up corrosion. The good news is that replacing anodes is usually straightforward if you choose the correct material, inspect the surrounding hardware, and avoid a few common shortcuts.
Boat anodes are intentionally more electrically active than the protected metal around them. When they are correctly installed and electrically connected, the anode corrodes first, preserving more valuable components such as bronze props, stainless shafts, aluminum outdrives, and engine cooling passages.
You may hear them called sacrificial anodes or, more casually, zincs. Zinc is still common, but it is not the right answer for every boat or every type of water. Aluminum and magnesium anodes are also widely used.
Replace an anode when roughly half of its original mass is gone. Do not wait until it disappears completely or becomes too thin to make a reliable electrical connection. A heavily pitted anode may still have plenty of material left, while one that looks fairly solid but is coated in hard marine growth or paint may not be working well at all.
A sensible inspection schedule depends on where and how you use the boat. Check anodes at least twice a year for a trailered boat that sees regular saltwater use. If the boat stays in a slip, inspect them every 60 to 90 days, especially during the summer. A new boat, a new marina, or a sudden change in anode wear all justify more frequent checks.
The right anode is determined by both the protected metal and the water where the boat spends its time. Mixing materials without understanding the system can create more trouble than it solves.
Zinc is traditionally used in saltwater. It remains a workable choice for many boats, particularly where it matches the manufacturer’s specified replacement part. Zinc is less effective in fresh water and can form a coating that reduces its performance under certain conditions.
Aluminum anodes are suitable for saltwater and brackish water, and many boaters prefer them for their broad usefulness and longer service life. Quality marine aluminum anodes are not the same as random aluminum stock. They use a specific alloy designed to protect marine metals.
Magnesium is intended for fresh water. It is highly active, which is exactly why it should not be installed on a boat that lives in saltwater. In saltwater, magnesium can disappear quickly and may overprotect certain systems.
Start with your engine, outdrive, trim-tab, or boat manufacturer’s recommendations. This is particularly important for outboards, sterndrives, and pod drives, where anodes are designed as part of a larger corrosion-protection system. If your boat moves between fresh and salt water, aluminum may be appropriate in many cases, but confirm the recommendation for your particular equipment before changing materials.
Most replacements do not require a full tool chest. Gather the correct replacement anodes and any manufacturer-specified fasteners before you begin. You will also want:
Avoid substituting hardware casually. Anode bolts and inserts are often sized and designed for a specific location. If threads are damaged, a bolt is severely corroded, or a captive insert is loose, address the issue before installing a new anode.
Begin with the boat safely out of the water whenever possible. Shaft, strut, trim-tab, outdrive, and hull-mounted anodes are easier to inspect properly on land. Some external anodes can be changed in the water by a qualified diver, but you lose the chance to closely examine props, running gear, and hull fittings at the same time.
Turn off battery switches and disconnect shore power before working around engine-mounted anodes or components near electrical bonding conductors. This does not eliminate all corrosion issues, but it reduces the risk of accidental electrical contact while tools are in use.
Take a photo of each anode before removal. It sounds simple, but it helps you note orientation, spacer placement, bonding-wire routing, and unusual wear patterns. A deeply eaten anode on one side only, for example, can point to a local electrical or bonding issue rather than normal galvanic activity.
Remove the old anode carefully. On a shaft collar anode, loosen the fasteners evenly and keep track of any recessed screws or locking hardware. On an engine pencil anode, use the correct wrench and avoid forcing a corroded plug. On trim tabs, outdrives, and transoms, support the anode as the last fastener comes free so it does not damage the finish or fall onto the concrete.
Clean the contact surface to bright, bare metal where the anode is meant to make electrical contact. This is the detail many do-it-yourselfers miss. An anode installed over paint, corrosion scale, sealant, or heavy oxidation may look secure but remain electrically isolated. Use a wire brush or abrasive pad lightly, taking care not to damage threads, seals, or surrounding coatings.
Install the new anode in the same position as the original and tighten fasteners evenly. Follow the manufacturer’s torque specification when one is available. Overtightening can strip threads, crack cast components, or distort a soft anode. If a manufacturer permits anti-seize on fastener threads, use only a thin amount and keep it off the anode-to-metal contact faces.
Finally, confirm that nothing is rubbing where it should not. Shaft anodes need proper clearance from struts and couplings. Propeller and outdrive anodes must not interfere with moving components. Pencil anodes need sound sealing at their plugs, with no coolant leaks after the engine is returned to service.
A new anode will not fix the underlying problem if the old one disappeared in a few weeks. Normal wear is gradual. Dramatically fast wear, unusual cratering, or one anode eroding while another stays untouched deserves investigation.
Common causes include a poor bond, an anode electrically isolated by paint or fouling, incompatible anode material, or stray-current corrosion. Stray current can come from your own boat, another vessel, dock wiring, battery chargers, or shore-power equipment. It can damage metal far faster than ordinary galvanic corrosion.
If you suspect a stray-current issue, do not guess by adding larger anodes or mixing metals. Have a qualified marine electrician test the boat and dock environment. Checking the shore-power cord, galvanic isolator, battery charger, AC grounding, DC negative connections, and bonding system is money well spent when the alternative may be an outdrive, shaft, or underwater fitting.
DO NOT. I repeat. DO NOT paint your anodes. Painting over anodes is one of the most common errors. Bottom paint and antifouling coatings can electrically isolate the anode, preventing it from doing its job. Keep anodes clean and exposed. If your bottom paint manufacturer offers a coating specifically intended for anodes, use it only when it is compatible with your corrosion-protection system.
Another mistake is treating every underwater metal part as if it needs an anode. More anode is not automatically better. An oversized or improperly placed anode can contribute to overprotection, which may damage coatings and affect aluminum components. Follow the boat’s and engine system’s design rather than improvising.
Also resist the temptation to judge anodes by appearance alone. A lightly worn anode, isolated from the protected metal, is not protecting anything. Conversely, an anode with rough, active-looking wear may be doing exactly what it was installed to do.
The best time to inspect anodes is when you are already looking at the boat: during a haul-out, before a long trip, after changing marinas, or while servicing props and bottom paint. Keep a quick record of when they were installed and how much material remains at each inspection. After a season or two, you will know what normal wear looks like for your boat and your home waters.
That small habit turns anodes from an overlooked maintenance chore into an early-warning system. A fresh, properly fitted anode is inexpensive protection, but the real value lies in what its wear pattern can tell you about the metal and electrical systems beneath the waterline.
As always, Safe Boating.
William B.
A good day on the water can turn expensive fast when a lower unit meets an unmarked obstruction, a storm
A calm morning at the ramp can make any boat look like the right boat. The real difference shows up